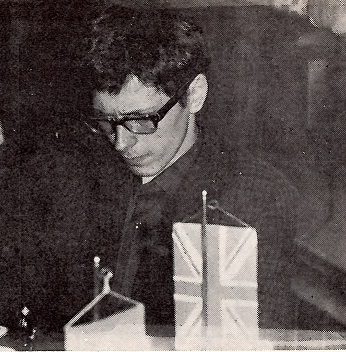
Michael Basman
Editor’s note: What is striking about these games is how each highlights different aspects of Mike’s playing style. As you might expect, there is his calling card – the outlandish opening 1 e4 g5 (‘totally bonkers’ –Nigel Short), but next is an epic R+B+P v R ending where Mike struggles to win a position he had reached before (and only drawn) against William Hartston years earlier. Then comes the final act, a tragic loss to Murray Chandler in the last round after a promising start: ‘The opening begins “normally”; but after 10 moves we are in a position unknown to man.’ We see three Basmans: the openings explorer, the endgame technician and the fall guy.

© John Henderson
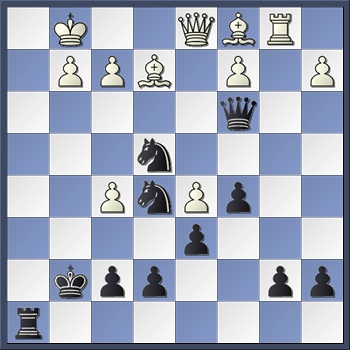
After 8 rounds I had played a good tournament, surviving one of Jonathan Speelman’s attacks in round 3 and smashing K. Arkell with the Grob in round 6. But now I was slipping back, being unable to overcome two wily young opponents Levitt and McDonald in rounds 7 and 8. What to do? At such times one reaches for a bottle of Grob and out pops the win.
Craig Pritchett – Michael Basman
British Championship (9)
Southampton, 1986
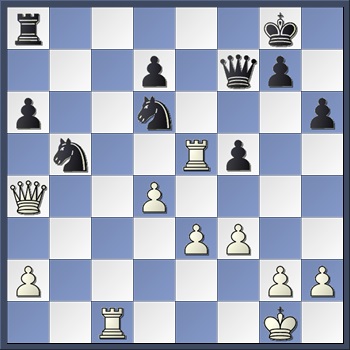
1 e4 g5 2 d4 Bg7
Generally I play 2…h6 here, but two mighty defeats in the recent Scottish Championship at the hands of Morrison and Bryson convinced me that I would need something more dynamic to survive this encounter. So the immediate …Bg7 to counter-attack in the centre.
Pritchett now thought for twenty minutes: it was clear he was considering whether to play 3 Bxg5, c3, or the move chosen.
3 Nc3
Since 3 Bxg5 allows 3…c5, and there is a pin on the d-pawn, White blocks the line but develops aggressively at the same time.
3…c5
Continuing in challenging style. White can play here 4 dxc5 Bxc3+ 5 bxc3 Qa5 6 Qd4 Nf6 7 Qb4 Qxb4 8 cxb4 a5 with an unclear position.
4 d5
White decides to go for the space advantage and a more closed position to suppress Black’s activity.
4…h6 5 h4 gxh4
Black usually has to accept this weakening of the h-pawn. |In return he deprives White of the castling option.
“At such times one reaches for a bottle of Grob and out pops the win”
6 Nf3 d6 7 Nxh4
Now Black needs to develop his Q-side, particularly the b8 knight which can obtain a square at e5. However, playing the knight to d7 allows the white knight in at f5. Nonetheless, this has to be permitted.
7…Nd7 8 Nf5 Bxc3+ 9 bxc3 Ne5 10 Bb5+ Kf8
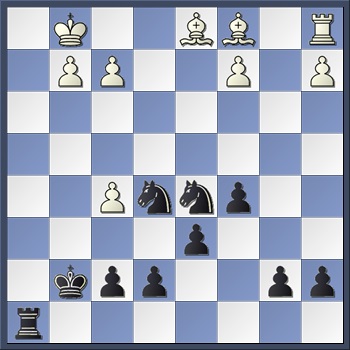
The king move is preferable to 10…Bd7, since after the exchange of bishops the knight at f5 could no longer be exchanged. Now the h6 pawn looks even more vulnerable – but it is simply a decoy, an illusion!
11 Be2
Played after long thought. I felt that 11 Rb1 would have been more active. White is threatened by the move …Qa5, attacking both the bishop and the pawn at c3, so this move removes one of the pieces from attack. Why is White not winning the position hands down? Possibly because he has extended his position by his early pawn and piece advances; and because of his pawn weaknesses, king is not safe.
11…Qa5 12 Kf1 Bxf5 13 exf5 Nf6!?
Black goes over to the offensive, finally discarding his pawn at h6 in order to centralise his knights.
“As often happens, a player asked to leave before his time finds a good response”
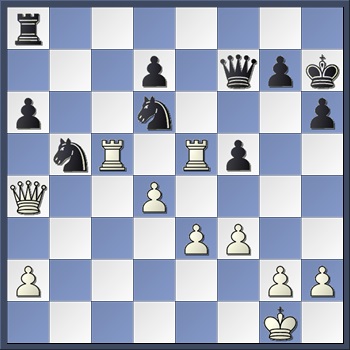
14 Rxh6
After 14 Bxh6+ black would play 14…Ke8 and later …Kd7. the bishop would then be pinned along the h-file.
14…Kg7
A moment of decision for White. He could have played 15 Qd2 here, when Black would have to choose either the simple line 15…Rag8 or the complex 15…Ne4 16 Qf4 Qxc3 17 Rb1 Qxc2.
15 Rxh8 Rxh8
Threatens mate in one.
16 Kg1 Qxc3
Now White is falling to pieces all over the board – in the centre, on the Q-side and on the king’s wing.
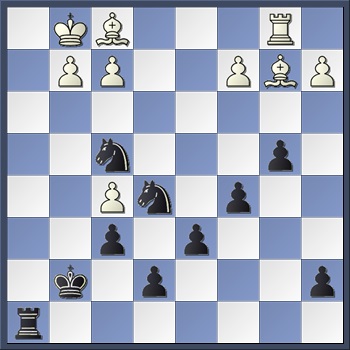
17 Rb1 Ne4!
Trying, in boxing terms, to put the opponent away while he is still reeling on the ropes. There are several ways for White to go down. For a start, the threat is 18…Rh1+ 19 Kxh1 Nxf2+ winning the white queen. Or, if White defends against this by 18 Be3, black has 18…Ng3!! 19 fxg3 Qxe3+ 20 Kf1 Rh1#.
Another try is 18 Bb2. I had hoped to meet this by the same move – 18…Ng3, but analysis showed that 19 Bh5! puts a damper on that one. No, 18 Bb2 must be countered by 18…Rh1+ 19 Kxh1 Nxf2+ 20 Kg1 Nxd1 21 Bxc3 Nxc3 22 Re1 Nxa2, and Black has two pawns for the exchange and a mighty Q-side majority which should surely win.
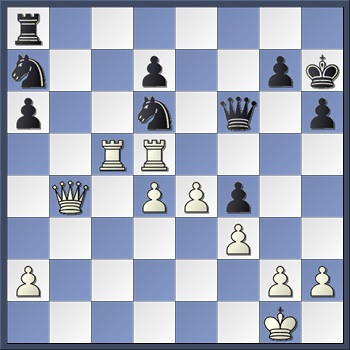
18 Bh5!
As often happens, a player asked to leave before his time finds a good response. This move keeps the white game alive and now he threatens the annoying 19 Bb2, lining up against all the black pieces on the long diagonal.
18…Qd4
Black decides to renounce brilliancies and exchange into an ending where he will hold a positional advantage and an extra pawn.
19 Be3
Black was threatening …Qxf2+, so White cannot avoid the queen exchange.
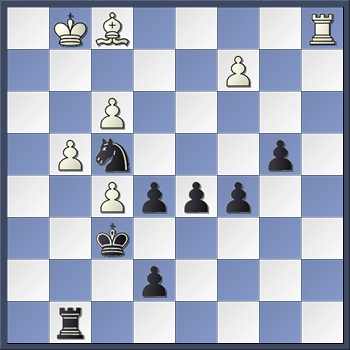
19…Qxd1+ 20 Bxd1 Nc3!
Forking too many of the white men. One of them must go.
21 Ra1 Nxd5 22 Bc1
This ending might be tenable if he can get his bishops working. Black’s problem is to keep them suppressed, and keep his knights in active positions. Unfortunately, White’s time trouble did not permit him to make the best use of his resources.
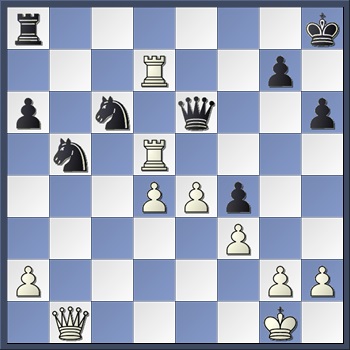
22…b5 23 Bb2 f6 24 Rb1 b4 25 Be2 Nf4 26 Bf1?
The first time trouble error. Now Black can profitably attack the pawns on the K-side, which he was unable to do while the bishop was at d1.
26… Rh5! 27 Bxe5
Unable to play 27 g4 (because of Nf3#!), White must part with his better bishop
27…fxe5 28 g4 Rg5 29 f3
The black pieces seem to be temporality locked away on the K-side; but this is only temporary.
29…Kf6
To allow the rook to return to the Q-side.
30 a3 a5 31 axb4 axb4 32 Bc4?
Only encourages Black.
32…d5 33 Bf1 Rg8 34 Ra1
At last the white rook becomes active, but it is too late to stop the avalanche of black pawns.
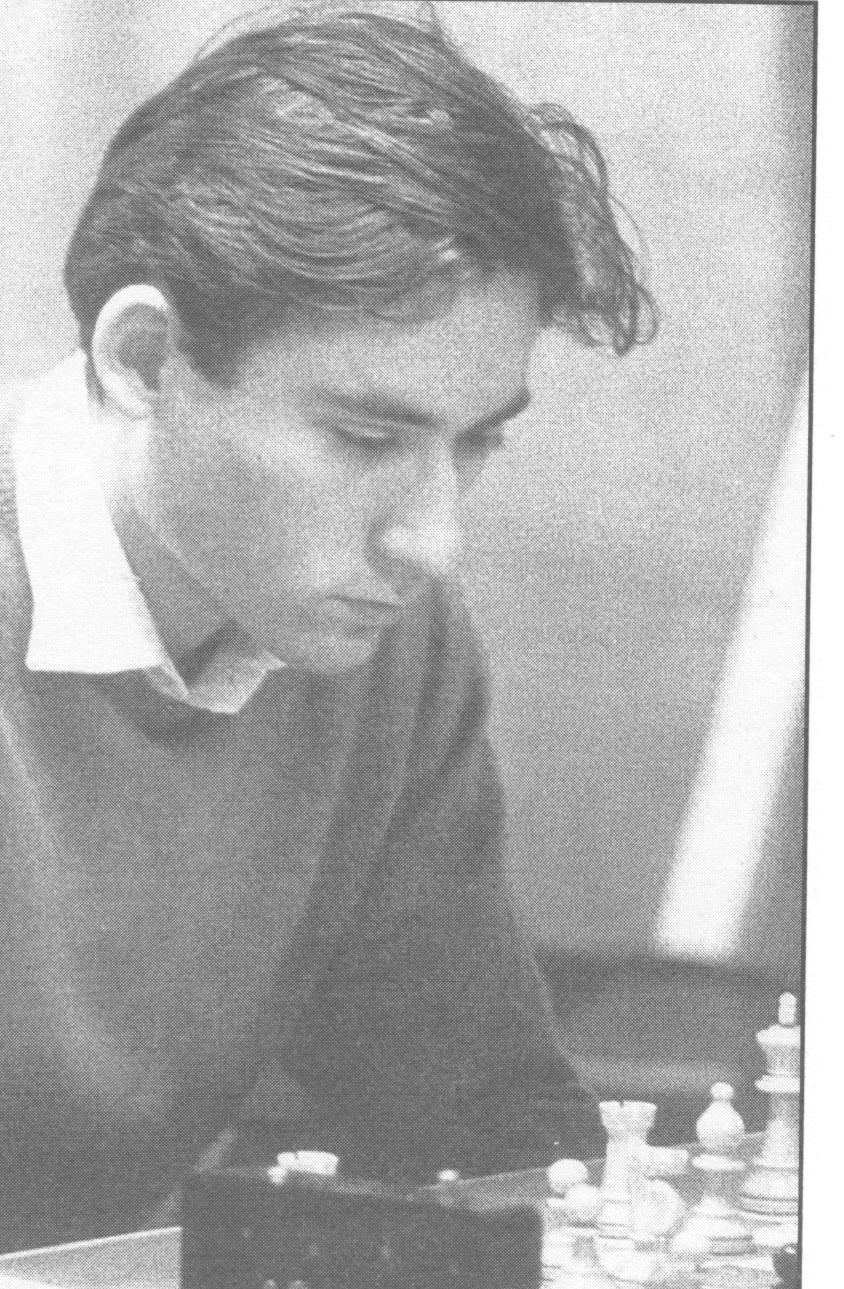
34…Rb8 35 Ra6+ Kg5 36 Ra7 c4 37 Rxe7 b3 38 cxb3 cxb3

And here White lost on time; but the b-pawn could not be stopped anyway.
0–1
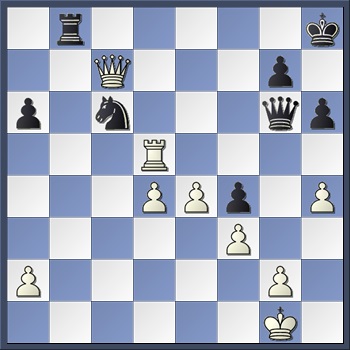
William Hartston
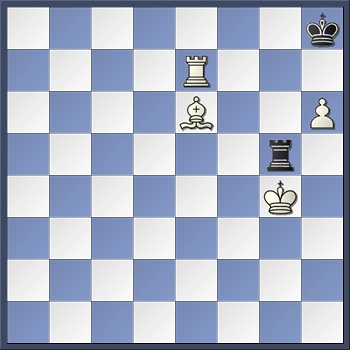
In round 10 I had played well against Devaki Prasad, the Commonwealth Champion. Adjourning a pawn up in the ending, it seemed that White’s central passed pawn would soon decide the game. But it became clear that Devaki would seize his only chance and sacrifice his bishop for two pawns to reach an ending of R v R+P + h-pawn. Now this position I had had before – 21 years before, against William Hartston in the First Slater Young Masters tournament of 1966. I drew the position, but could remember from Keene’s notes (and his comments at the time) that the position should have been a win. Trying to discover the win, I went to the bookstall to look for a copy of Basic Chess Endings. There was no copy. So, the game resumed with me knowing the position was a win, but not knowing how to do it.
 Basman –Prasad
41…Kg7 42 Ra6 Bxc4
Sure enough, Black takes his chance to sacrifice for the two pawns.
43 dxc4 Rxc4 44 Ra7+ Kf6 45 Bxh7 a4
The position materialises with White having rook, bishop, king and h-pawn against Black’s king and rook. The black pawn at a4 eventually has to be jettisoned and White’s problem is to queen his own h-pawn, an exchange of rooks leads to a draw. But keeping the rooks on allows all sorts of stalemate combinations by Black when the pawn approaches the queening square.
46 Kg2 Kg5 47 Ra5+ Kh6 48 Bf5 Rb4 49 Bg4 Rb2+ 50 Kg3 Rb3+ 51 Kh4
White’s king advances under the shelter of his bishop.
“for the second time I was thwarted from victory by unfair means and sent back to the board to find the win on my own”
51…a3 52 Ra6+ Kg7 53 Kg5 Rb7!
Just in time! If Black tries to hold his pawn any longer, he would end up in a mating net after White plays Ra7+.
54 h4 a2 55 Rxa2 Kh7 56 Bf5+ Kg7 57 h5 Rb8 58 h6+?
Not understanding this ending, White makes a mistake which denies his king access to the h6 square. Ravisekhar, who is an expert on endings with few pieces on the board, showed how White could have won much more quickly by playing 58 Ra7+ Kh8 59 Ku6 Rb6+ 60 Bg6! Rb8 62 Rh7+ Kg8 63 Bf7+ Kf8 64 Rh8+. Now, deprived of the sheltering square for the king at h6, the win becomes far more difficult.
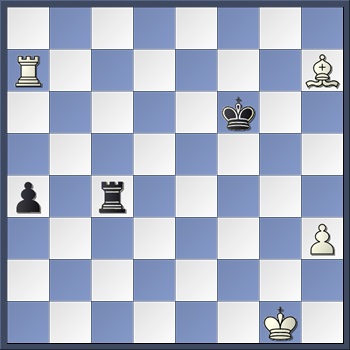
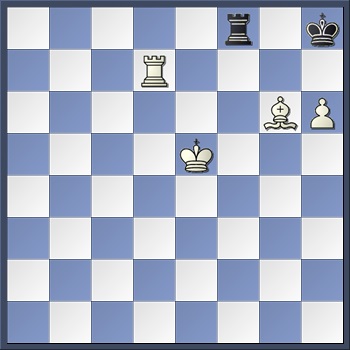
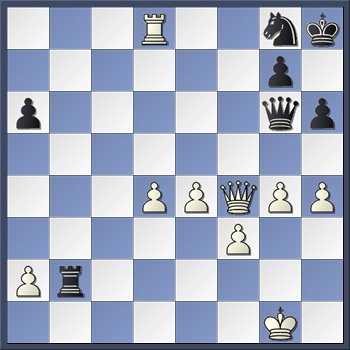
58…Kh8 59 Re2 Rg8+ 60 Bg6 Rb8
Before continuing with the game, try to work out for yourself how White could win this tricky ending of R+B+P v R.
The problem for White is to winkle the black king out of the corner. I worked out that if I could set up a position with rook at e7, king at g6, bishop at e6, then the threat pf mate would win. Unfortunately, Black is always able to ensure that by the time I set up the position, he has a rook at f8. At that point he can make a sacrifice for stalemate by Rf6+. Unable to resolve this problem, I spent many moves, and much time, wandering in the wilderness.
61 Re7 Rd8 62 Bf5 Rg8+ 63 Kh5 Rb8 64 Rf7 Re8 65 Kg5 Rg8+ 66 Kf6 Rb8 67 Re7 Rf8+ 68 Kg5 Rg8+ 69 Kh5 Rb8 70 Be6 Rb5+ 71 Kg4 Rg5+
Black’s first stalemate sacrifice. White has set up the position with rook at e7 and bishop at e6, but cannot get around with the king to g6. By now the situation was becoming uncomfortable. There was no danger of losing on time but it was clear that I was simply moving around in circles without achieving anything. At 10.30 I had hoped to adjourn again; then, in the comfort of my hotel, with a few Grandmasters roped in, I would suss out the win. But this was the penultimate round, and in order to clear away all the adjourned games before the start of round 11, the rule is that the round 10 game must be played to a finish. So for the second time I was thwarted from victory by unfair means and sent back to the board to find the win on my own.
72 Kf4 Rb5
Black is unable to continue sacrificing the rook for stalemate, since 72…Rf5+ or 72…Rg4+ are met by BxR.
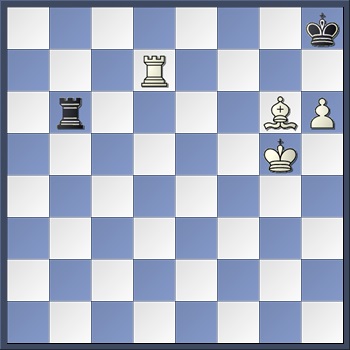
73 Ra7 Rb8 74 Bf5 Rf8 75 Kg5 Rg8+ 76 Kf4 Rb8 77 Rd7 Re8 78 Bg6 Rf8+ 79 Ke5
Here I developed another plan. If I could get the rook to d7, the king to b7(!) and the bishop to g6, this would cover all the squares on the back row. Black would then be in zugzwang. His rook would have to leave the back row allowing White to mate with Rd8, or he would have to play Rg8 permitting Rh7#. Unfortunately, this scenario is flawed. Instead of moving his rook from f8 Black can simply move his king back and forth between g8 and h8, and White has no way to impose the final zugzwang.
79…Rb8 80 Kf5 Ra8 81 Ke6
By now I had realised that the aforementioned plan was not going to work, so I reverted to attempting to set up the position with R at e7, B at e6 and K at g6.
81…Rb8 82 Kf6
And here I realised how it could be done. By placing the bishop at f7, I could allow the black king a flight square at h7 while setting up the winning position. This deprives Black of his stalemate resource.
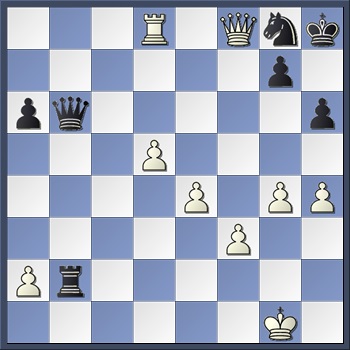
82…Rb6+ 83 Kg5
Note the sequence: if here 83…Rb5+ 84 Bf5 Rb8 (to stop mate by Ra8) 85 Be6 Rf8 86 Bf7! Kh7 87 Kf6 Kxh6 88 Rd5 and wins. After 86 Bf7, if black’s rook leaves f8, White will be able to bring his king to g6 successfully: 86…Rb8 87 Kf6 Rb6+ 88 Be6 Rb8 89 Kg5! And the threat of Rh7# wins, as black’s rook is no longer at f8 to deliver the stalemate check by Rf6.
83…Rb8 84 Bf7 Ra8 85 Re7!
This is to allow the bishop to come to e6 in case of a lateral check by the black rook.
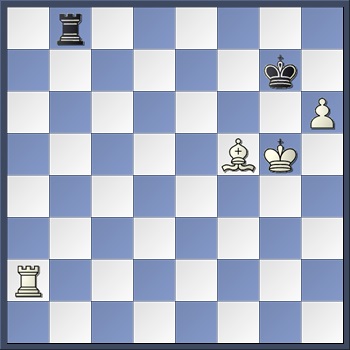
85…Rb8 86 Kg6 Rf8
A last despairing throw. White can still fail by playing too eagerly 87 Be6?? Rf6+ – which is what I believe happened against Hartston 21 years ago.
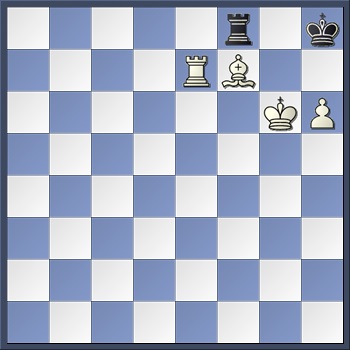
87 Rd7
Zugzwang! and Black, at 12.30 a.m., resigns. After 87…Rb8 88 Be6 clinches the win. 1-0
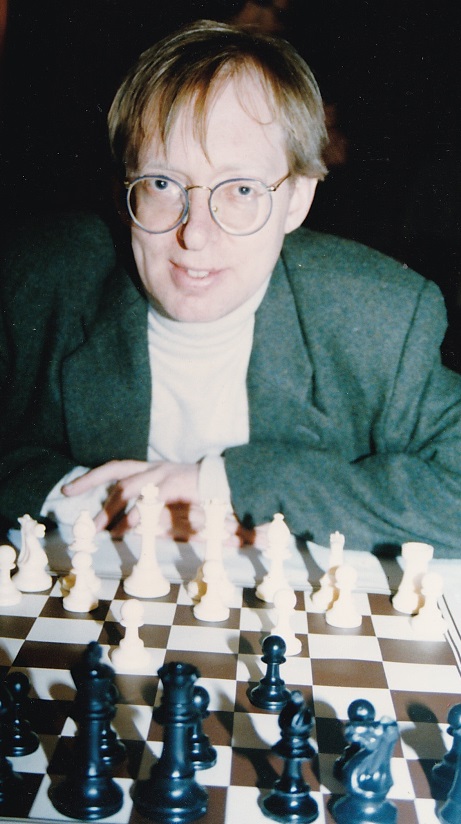
Michael Basman in 1967
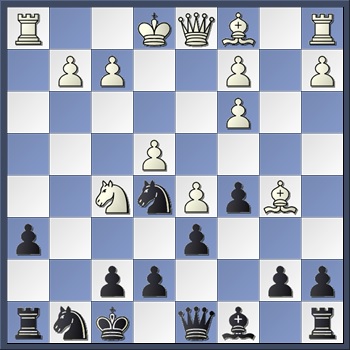
Michael Basman – Murray Chandler
British Championship (11)
Southampton, 1986
1 d4 Nf6 2 c4 e6 3 Nc3 Bb4
The opening begins ‘normally’; but after 10 moves we are in a position unknown to man.
4 e3 0–0 5 Nf3 c5 6 dxc5
White does not waste time with a3; but he exchanges the pawns to open the game for his (putative) two bishops.
6…Ne4 7 Qc2 Bxc3+ 8 bxc3 Nxc5
Now Black has doubled the white pawns and established a fine outpost for his knight at c5. But because White has not yet played a3, he can obtain good lines for his pieces.
Murray Chandler
“Chandler seemed to be deliberately complicating the position despite his time trouble”
9 Ba3 b6 10 Rd1 Bb7 11 Be2 Nba6 12 0–0 f5 13 Nd4 e5
White is attempting to play Bf3 to exchange Black’s next able piece. However, 13…e5 prevents the plan since if White now plays 14 Nxf5 then …Be4 wins the knight. And 14 Nb5 looked feeble after …Qg5! 15 g3 f4. Fortunately for White, he has a continuation which leads to unclear play.
14 Bf3! exd4 15 Bxb7 Nxb7 16 Bxf8 Qxf8 17 cxd4
“that Black managed to win this game is a credit to his fighting spirit or White’s incompetence”
The smoke clears and we are in a completely different situation. Black has two pieces against rook and pawn, but he has lost his outpost square at c5. In fact, for the next ten moves black finds that his knights are totally unable to find good squares, and it is this fact, along with the activity of the white rooks and his strong centre, that gives White the advantage.
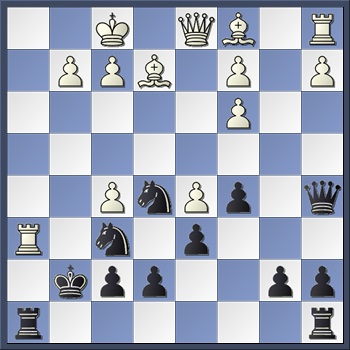
17…Qf7 18 Qa4 Nc7 19 f3 Nd6 20 Rc1 Qe6 21 Rfe1 a6 22 c5 bxc5 23 Rxc5 Ncb5 24 Re5 Qf7 25 Rc1 h6
Black is completely tied up, and to add to his difficulties he is a long way behind on the clock. He may have had only fifteen minutes left to White’s 50. The fact that Black managed to win this game is a credit to his fighting spirit or White’s incompetence, depending on which analytical viewpoint you take. At the time, Chandler seemed to be deliberately complicating the position despite his time trouble, and this caused me to spend more and more time unravelling the variations.
26 Rc2
White is possibly planning something like Qb4 and a4, driving the black knights back still further.
26…Kh7 27 Rcc5
But now I realised that 27 Qb4 freed the black rook from its defence of a6, and 27 Qb4 Rc8 28 Rxc8 Nxc8 29 a4 Nd6 was no longer so inviting.
After 27 Rcc5, White threatens to capture the knight on b5.
27…f4!
Introducing complications and even mating threats.
28 e4 Qf6!
White has now to beware of Black playing …Qh4 and threatening mate at e1, or at least perpetual check. There is also a concealed attack on the d4 pawn.
29 Qb4
Played to control e1, as well to prepare e4.
29…Na7!
Now threatening a fork by 30…Nc6.
30 Red5
The battle between the rooks and the knights rages on. Black could now play 30…Nc6, when 31 Rxc6 dxc6 32 Rxd6 looks good for White, but you try and get out of perpetual check after 32…Qh4! 33 h3 Rb8!. Possibly White could play 31 Qd2 Rb8 and 32 Rc1, threatening e5.
30…Ndb5 31 Rxd7 Nc6 32 Qb1
Now I had resigned myself to an equal ending after 33…Nbxd4 34 e5+ Qg6 35 Qxg6+ Kxg6 36 Rd6+ Kf5 37 e6+ Kf6 38 Rxc6 Nxc6 39 Rxc6 Rb8!. However, Black’s next move keeps alive the winning chances – for both sides!
32…Qe6!? 33 Rcd5 Kh8!
Not, of course, 35…Nc3 36 Qb7! Nxd5 37 Rxg7+ and a quick mate.
But now, had White played something like 34 Qd3 (…Nb4 35 Rd8+) or even 34 Qb2Rb8 35 Qd2, thus avoiding Black’s threat to fork at c3, it seems that Black is running out of ideas. White has rook plus two strong central pawns against the knights, and this should be a big advantage. However, this was move 34. There were still 7 moves to make before the time control and White, unexpectedly, had found himself short of time as well.
34 h4?
A panicky move which quickly loses material.
34… Nc3! 35 Qb7 Rb8 36 Qc7
White has no check at g7 anymore.
36…Nxd5 37 Rxd5
And here the attempt to regain the piece after 38 exd5 allows a quick mate by 38…Qe1+.
37…Qg6?
Black also blunders. His attempt to mate at g2 allows White back into the game.
38 Qxf4!
White now has three pawns for the piece, and Black’s threat of checkmate by …Rb2 is successfully parried.
38…Rb2 39 g4 Ne7 40 Rd8+?
40 Qf8+ Ng8 41 Rd6 looks a lot stronger.
40…Ng8
Move 40 has been reached but the contestants still careered madly on. I’m not certain of the outcome of this position, but certainly an adjournment at this stage would have enabled White to find something superior to the game continuation.
41 Qf8? Qe6 42 d5?
Seeming to win because Black can no longer guard his knight at g8. But what about the white king?
42…Qb6+!
When I saw this move my heart sank as I realised that my own king was at the mercy of the black queen and rook.
43 Kh1 Rb1+

44 Kh2?
Jon Speelman pointed out 44 Kg2! Here showing, amazingly, that White wins if Black now plays 44…Qg1+ 45 Kh3 Qh1+ 46 Kg3 Qg1+ 47 Kf4. Whether Chandler would have chosen this instead of the correct 44…Qb2+! 45 Kg3 Qe5+! 46 Qf4 Rg1+ I do not know.
44… Qf2+
And White Resigned. After 45 Kh3, Rh1 is mate. 0–1
First published in Kingpin 10 (Winter 1986)
See also
Confessions of a Crooked Chess Master – Part 1
Confessions of a Crooked Chess Master – Part 2