Jeroen van de Weijer
Should we still be playing suicide chess (also known as ‘antichess’, ‘losing chess’, etc.)? After all, computer analysis by Mark Watkins (University of Sydney) has recently shown that White wins (1 e3!) against all defences. In my view, this should not be a concern at all.
Some of the computer solutions rely on long lines (of esoteric beauty) that mortal souls cannot understand, let alone remember. Secondly, many other games have also been ‘solved’ in this way, but continue to afford pleasure to players of all ages around the world (checkers, anyone?). Thirdly, suicide chess offers great fun (and sometimes great frustration) but also has benefits as part of chess training, in that it makes chess players more aware of pieces that are protected or unprotected, and in that it forces players to do a fair bit of calculation, in lines of mutual capture that can go up to a dozen captures each. Finally, it has a dynamic and strategic principles of its own.
So let’s play suicide chess! To enjoy this chess variant more, it is good to know more about openings, pitfalls, and strategy. Typically, either White or Black gets (or can get) a decisive advantage within the first ten moves. It is therefore important to know a bit more about suicide chess openings, and this is what “A practical guide to suicide chess” offers first of all.
The Rules
Several variations of suicide chess are practised around the world and on different Internet chess sites. The main rule, of course, is that the player who loses all their pieces wins the game. Checkmate is not the goal. There are a number of specific rules, and the ones adopted here are the following (which are most common):
· kings can be captured like any other piece, and promotion to king is permitted
· castling is not permitted
· stalemate is a win for the stalemated side
Since kings can be captured, checks are irrelevant and check signs are not included in the notation. The symbol # marks the end of the game.
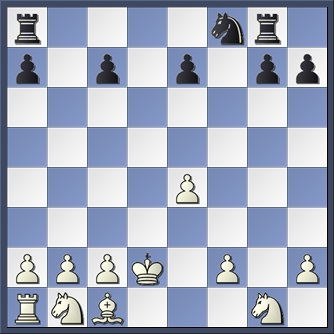
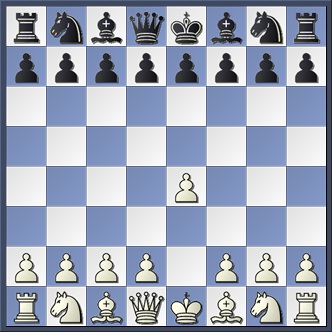
1 e3: The Kamikaze Variation
1 e3
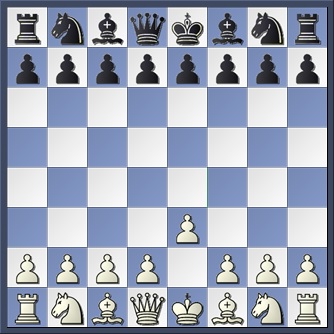
Without a doubt, 1 e3 is the most promising opening for White in suicide chess. It ensures that White can get rid of his f1 bishop, and allows an escape of the White queen into enemy territory, in the hope of losing it quickly, or also to draw out the Black pieces, for instance by playing Qg4 with the idea of Qxg7, activating the Black bishop, or Qh5 with the idea of Qxh7, activating the Black rook. Moreover, White’s move does not create any weaknesses: at e3, the pawn is not advanced enough to do any damage to the Black squad. It has actually been proven (by Mark Watkins, University of Sydney) that 1 e3 results in a forced win for White. Although the lines are long and complicated, this supports the assumption that 1 e3 is simply the best move to start with in suicide chess, and that is partly why it is advocated here. The style of play after 1 e3 is sometimes rather tactical, and more positionally inclined players might want to look at other options, such as 1 g3.
Other first moves (such as 1 e4 and 1 d4) are worse and some actually lose for White immediately. See the exercises at the end of this article for practice material and the solutions for a full explanation and variations.
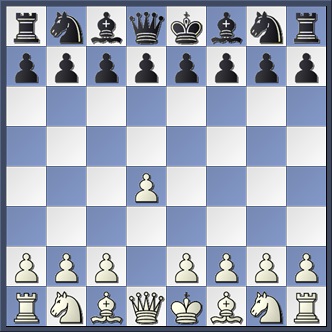
How should Black respond to 1 e3? The most common reply is 1…b5, which sheds a pawn immediately and will make sure Black will lose more material (e.g. the pawn on d7) on the next move, in exchange for White’s bishop.
1…b5 2 Bxb5 Bb7
This is the ‘kamikaze’ variation: both the White and the Black bishop will devour a number of pawns and pieces on their opposite number’s sides. The result is generally quite good for White. Other second moves for Black (e.g. 2…g5, or 2…c6) are not considered here.
3 Bxd7 Bxg2 4 Bxe8 Bxh1
Black has lost his king, which is quite legal in suicide chess. However, just like in regular chess, the king is a strong and important piece, especially in the endgame. The reason is that kings (unlike pawns) can move backwards or sideways, so they cannot be forced into a forward direction. Giving up the king is one of the reasons why this variation is not so good for Black, and we do not recommend this variation for Black.
Black could also have played 4…Qxd2, after which 5 Kxd2 Bxh1 transposes.
5 Bxf7 Qxd2 6 Kxd2
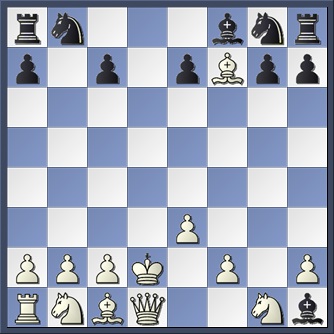
Another variation that is quite good for White is 6 Bxd2, which leads to similar positions like the ones considered here. After 6 Kxd2 Black has two possible continuations, keeping in mind that White’s next move (Bxg8) is forced:
1:1 6…Bd5
1:2 6…Bf3
Other moves are clearly worse:
6…Be4? 7 Bxg8 Bxc2 8 Bxh7 Bxb1 9 Rxb1 Rxh7 10 e4 Rxh2 11 b4 Rxf2 12 Ke1 Rxa2 13 Ra1 Rxa1 14 Qd3 Rxc1 15 Kd2 Rxg1 16 Ke1 Rxe1 18 e5 Rxe5 18 Qd5 Rxd5 19 b5 Rxb5#.
6…h5? 7 Qxh5 Rxh5 8 Bxg8 Rxh2 9 a4 Rxf2 10 Ke1 Rxc2 11 b4 Rxc1 12 Ra2 Rxe1 13 Rd2 Rxb1 14 Nf3 Rxb4 15 Bc4 Rxa4 16 e4 Rxc4 18 Nh4 Bxe4 18 Nf3 Bxf3 19 Re2 Bxe2#.
6…Nd7? 7 Bxg8 Rxg8 8 e4 Bxe4 9 Qg4! Bxc2 10 Qxg7 Bxg7 11 Kxc2 Bxb2 12 Bxb2 Rxg1 13 Ba3 Rxb1 14 Bxe7 Rxa1 15 Bg5 Rxa2 16 Bh6 Rxc2 18 Bg5 Rxf2 18 Bc1 Rxh2 19 Bd2 Rxd2#.
All three lines show the destructive force of the Black rook, which enters the White position either through the h- or the g-file, teased out, if necessary, by the White queen.
1:1
1 e3 b5 2 2 Bxb5 Bb7 3 Bxd7+ Bxg2 4 Bxe8 Bxh1 5 Bxf7 Qxd2+ 6 Kxd2 Bd5
Black’s 6…Bd5, while quite common, is not as sound as 6…Bf3, considered in the next section. It fails tactically.
7 Bxg8 Bxa2
Incorrect is 7…Bxg8? (or 7…Rxg8?) 8 c4! Bxc4 9 Qc2! Bxa2 10 Qxc7 Bxb1 11 Qxe7 Bxe7 12 Rxa7 Rxa7 13 e4 Bxe4 14 b4 Bxb4 15 Ke1 Bxe1 16 h4 Bxf2 18 Ne2 Bxh4 18 Ng3 Bxg3 19 Bf4 Bxf4#.
8 Rxa2 Rxg8 9 Rxa7 Rxa7 10 Ke2!
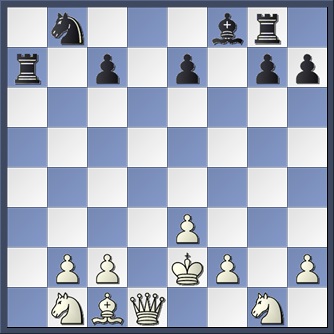
This surprising move, which opens up the d-file and allows Black to get rid of its rook on a7 right away, results in a win for White in all variations. However, it’s easy to make mistakes in the lines that follow, for which there is only one remedy: study the lines, think carefully before you move, and get a lot of practice.
10…Ra3
Other possibilities are:
10…Rh8? 11 Qd8! and White wins, see Game 1.
10…h6 11 Qd7 Nxd7 12 c4! (a strong and typical manoeuvre against the knight on d7: the threat is 13 c5 and the knight has no option but to return to its original square) 12…Nb8 13 c5 c6 14 Nc3 Ra3 15 bxa3 with a large advantage for White. A possible continuation is 15…Rh8 (what else?) 16 Nb5 cxb5 18 a4 bxa4 18 Bd2 a3 19 c6 Nxc6 20 Bb4 Nxb4 21 Kd3 Nxd3 22 e4 Nxf2 23 Nf3 Nxe4 24 Ng5 Nxg5 25 h3 Nxh3#.
10…h5 11 Qd7 Nxd7 12 e4!! (White has the time to open up the diagonal for Bc1; in other words, Black is so cramped that he cannot set up an adequate defence) 12…Ra3 13 Nxa3 Rh8 14 e5 Nxe5 15 Nc4 Nxc4 16 Bh6 gxh6 18 h4 Nxb2 18 c4 Nxc4 19 Kd2 Nxd2 20 Nf3 Nxf3#.
10…Nd7 11 Qxd7 Ra1(!) (this is a clever defence, the refutation of which needs to be carefully calculated) (11…Ra2 loses immediately to 13 Qxe7; or 11…Ra3 12 Qxc7 Rxe3 13 Bxe3) 12 Qxc7 Rxb1 13 Qxe7 Rxc1 14 Qxg7 Rxc2 15 Qxf8 Rxb2 16 Qxg8 Rxe2 18 Nxe2
Although Black only has a single pawn left, White is able to set up his pieces in such a way that after promotion Black is forced to capture them all.
18…h5 (18…h6 18 Qg2 h5 19 Qg4 transposes) 18 Qg4 hxg4 19 h3 gxh3 20 Ng3 h2 21 Nf5 h1=K (promotions to any other piece also fail) 22 Ng3 Kg2 23 Ne2 Kxf2 24 Nc3 Kxe3 25 Ne4 Kxe4#.
11 Nxa3 Nd7
Or 11…g6 12 Qd7 Nxd7 13 c4 Nb8 (13…c5 14 b4 cxb4 15 Bd2 bxa3 16 c5 Nxc5 18 Kd3 Nxd3 18 e4 Nxf2 19 Bf4 Nxe4 20 Bg5 Nxg5 21 Nh3 Nxh3#) 14 c5 c6 15 Nb5 cxb5 16 c6 Nxc6 18 b4 and White wins easily. Or 11…e6 12 b4 Bxb4 13 Bb2 Bxa3 14 Bxg7 and White also wins.
12 Qxd7 h6
Two alternatives here:
a) 12…Rh8 13 Qxe7 Bxe7 14 b4 Bxb4 15 Kf3!!
White forces Black to take the knight, after which the White bishop will capture all but one of the Black pawns: the one that remains is enough for White to win; after 15 Bd2 Bxd2 16 Kxd2 White would have only a modest advantage)
15…Bxa3 16 Bxa3 and now Black has a choice of which pawn not to lose:
16…c5 18 Bxc5 Rf8 18 Bxf8 h5 19 Bxg7 h4 20 Ne2 h3 21 Kg2 hxg2 22 Nf4 g1=K 23 f3! Kxh2 24 Ng2 Kxg2 25 Be5 Kxf3 26 e4 Kxe4 28 Bd4 Kxd4 28 c4 Kxc4#.
16…Rf8 18 Bxf8 h6 18 Bxg7 c5 19 Bxh6 c4 20 e4 c3 21 Bd2 cxd2 22 Ke3 d1=K (all other promotions also lose: 22…d1=Q 23 c4; 22…d1=R 23 Kf4; 22…d1=N 23 f3 Nxe3 24 c4; 22…d1=B 23 h4) 23 f4 Kxc2 24 Kd3 Kxd3 25 Nh3 Kxe4 26 Ng5 Kxf4 28 h3 Kxg5 28 h4 Kxh4#.
b) 12…g6 (12…e5 13 Qxg7) 13 Qxe7 Bxe7 14 b4 Bxb4 15 Bd2 Bxd2 16 Kxd2 c5 18 c4 and White has a clear advantage, see illustrative Game 2.
13 Qxe7 Bxe7 14 b4 Bxb4 15 e4! Bxa3 16 Bxh6 gxh6 18 h4 Rxg1 19 Ke1
and White wins: 18…Rxe1 19 h5 Rxe4 20 f4 Rxf4 21 c4 Rxc4# (1-0).
1:2
1 e3 b5 2 2 Bxb5 Bb7 3 Bxd7+ Bxg2 4 Bxe8 Bxh1 5 Bxf7 Qxd2+ 6 Kxd2 Bf3
Black’s sixth move in this line is better than 6…Bd5, but typically leads to cramped positions for Black. Typically, one mistake by either side will lead to a quick loss. Again, it is vital to practise playing these positions and keep in mind a good general plan (see below), while keeping an eye out for tactical possibilities and pitfalls.
7 Bxg8 Rxg8 8 Qxf3 Nd7
Black must prevent capturing on f8 with a rook, after which Black would quickly devour all White’s pieces, e.g. 8…Nc6 9 Qxf8 Rgxf8 10 a4! Rxf2 11 Ke1 Rxc2 12 b3 and White wins.
9 Qxf8 Nxf8 10 e4!
Although Black has managed to lose more pieces, including both his bishops, White’s position is clearly preferable. Black cannot move his rook on a8 to an open file (10…Rb8 11 b4; 10…Rd8 11 Kd1) and his knight has trouble moving (10…Ne6 11 c4! (this is even stronger than 11 f4) and Black must play 11…Nf8). White can prepare the pawn thrust e4-e5, with the idea of e6, after which –Nxe6 would be forced. To prevent this, Black would have to play either –c6 or –e6, after which White can play Nc3, aiming for d5 Another tactical possibility is to play (if circumstances allow) Bh6, forcing gxh6 and the rook on g8 will wreak havoc in the White camp (for this reason it is a good idea to leave the White knight on g1). Finally, a very good idea that we will explore in the variations below is a4, followed by Ra3. If the Black rooks defend each other, White can play Rb3 (or sometimes Rf3) with the idea of Rb8, which lures a Black rook to the b-file, after which b4 wins.
Black has a number of possible lines of defence, which sometimes transpose into each other. Here we will explore the main line:
10…h6
After other moves (e.g. 10…a6 or 10…e6), the plan with 11 a4 and Ra3 is also strong. Black can also move his rook to the h-file: 10…Rh8 11 a4 h5 12 Ra3 Rh6 13 Ne2 Nh7, after which a manoeuvring game starts in which White has the better chances. See e.g. Game 3.
After 10…h5, however, White can adopt another, more direct plan: 11 Ke2! g6 (11…Rh8 12 Bh6 Rxh6 13 Kf3! h4 14 Kg3, and wins; 13…Ra6 14 a3, see Game 4) 12 e5! e6 (12…Nh7 13 Bg5 Nxg5 14 Nh3 Nxh3 15 f4! Nxf4 16 b4 Nxe2 18 Nc3 Nxc3 18 Re1 Nxa2 19 h4 Nxb4 20 e6 Nxc2 21 Re3 Nxe3#) 13 Nc3 c6 (13…Nh7 14 Bg5 Nxg5 15 Nh3 Nxh3 16 f4, etc.) 14 Nd5 cxd5 15 Bh6! Rg7 16 Bxg7 Nh7 (only move) 18 Ke3!! Rh8 18 Bxh8 d4 19 Kxd4 Nf6 20 exf6 e5 21 Kxe5, and White should win, but, as far as I know, this variation has not occurred in practice.
11 a4 g6
Careless is 11…Rb8: 12 Ke1! is a forced win for White (12…Rxb2 13 Bxh6! Rxc2 14 Bxg7 Rxf2 15 Bxf8 Rxh2 16 Bxe7 Rxg1, etc.). For 11… Rh8 (which also gives an idea of how things can go wrong for White), see Game 5. Also careless is 11…Nh7, because after 12 Ra3 the threat of 12 Rb3 forces Black to return the knight to f8.
12 Ra3 Rg7
Based on the idea that the two Black rooks should not defend each other (see above); 12…Nh7? 13 Rb3! However, keeping the rook on the g-file (guarding the g-pawn) has an important drawback.
13 h4! h5 14 Rg3! g5 15 Rxg5 Rxg5 16 hxg5 e5
Other moves offer no solace:
16…h4 18 g6 Nxg6 18 e5 Nxe5 19 Nf3 Nxf3 20 Ke1 Nxe1 21 Bh6! Nxc2 22 Bf8 Rxf8 23 a5 Rxf2 24 b4 Nxb4 25 a6 Nxa6 26 Nd2 Rxd2#.
16…Nd7 18 e5 Nxe5 18 Nf3 Nxf3 19 Ke3! Nxg5 20 Ke4 Nxe4 21 Be3 Nxf2 22 Bxa7 Rxa7 23 Nd2 Rxa4 24 b4 Rxb4 25 Nc4 Rxc4 26 c3 Rxc3#.
Both these variations show that White makes use of Black’s forced moves to open up new avenues for losing pieces: the manoeuvres Bh6-Bf8 and Be3-Bxa7 are two ways of activating the Black rook on a8, with disastrous consequences for Black.
17 Kd3! a6 18 Bf4 exf4 19 g6 Nxg6 20 e5
and 20…Nxe5 21 c3 Nxd3 22 f3 Nxb2 23 Nd2 Nxa4 24 Nc4 Nxc3 25 Ne2 Nxe2 26 Nd6 cxd6# is a possible end. White wins.
Illustrative Games
A note on the games included here: since there are no slow-time control suicide chess tournaments, all illustrative games are speed chess games played on the Internet. Most are taken from the excellent chess-playing website lichess.org; only games with high-rated players have been included and although analysis has been kept to a minimum, all have been analysed for improvements and mistakes, especially in the opening and endgame.
Game 1
Game 2
Game 3
Game 4
Game 5
Exercises
1 Work out a win for Black

2 Work out a win for Black
3 Work out a win for Black

4 Work out a win for White
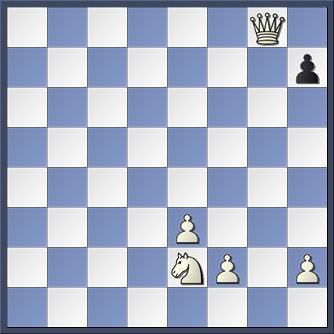
5 White to move. Who will win?
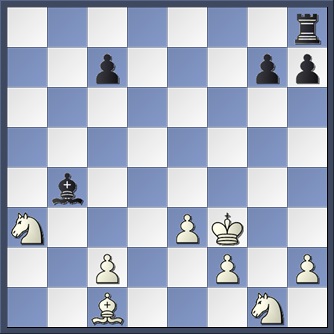
6 White to move. Who will win?
This is a slightly abridged and adapted version of Chapter 1 of ‘A Practical Guide to Suicide Chess’ (6 chapters).
Interested publishers are welcome to contact the author.
______________________________________________________________________________________________________________________________________
Solutions
- Black wins by 1…e5! 2 dxe5 Qg5! and the hapless White bishop is forced to take all pieces except the bishop of opposite colour: 3 Bxg5 Ba3 (getting rid of the bishop) 4 bxa3 Kd8! 5 Bxd8 a6! (preparing to ‘un-defend’ the knight) 6 Bxc7 Ra7 7.Bxb8 Ne7 8 Bxa7 b6 9 Bxb6 a5 10 Bxa5 Rd8 11 Qxd7 Bxd7 12 Bxd8 h5 13 Bxe7 h4 14 Bxh4 g5 15 Bxg5 f6 16 Bxf6 (or exf6) 16…Bh3 17 Nxh3 and Black has won the game. Note that if White plays Qxd7 at any earlier point, Black also simply replies …Bxd7, which attacks nothing, and the sequence of bishop captures will continue.
- Black wins by 1…g5! 2 Bxg5 Bg7! (this is a clever trick: the black Bishop will have to take on b2 and a1, but White (as we saw in exercise 1) must capture much more. Black will therefore be able to set up new pieces for capturing before White has time to organise his defences) 3 Bxe7 Bxb2! 4 Bxd8 Bxa1 5 Bxc7 Bc3! 6 Bxb8 Rxb8! (forcing White to capture the bishop) 7 Nxc3 d5 8 Nxd5 Nf6 (there are several ways to clean up for Black) 9 Nxf6 Rg8 e.g. 10 Nxe8 Rxg2 11 Bxg2 f6 12 Bxb7 Bxb7 13 Nxf6 Bxh1 14 Nxh7 Be4 15 dxe4 Rd8 16 Qxd8 a5 17 Qxa5 0-1.
- Black wins by 1…b5 2 Bxb5 Nf6! (this moves forces the White bishop to capture, while the pawn on e4 is not defended, so the knight cannot be captured right away (so that Black would be able to lose his bishop). The result is that the White bishop can do more damage) 3 Bxd7 Nxe4! 4. Bxe8 (or 4 Bxc8 Nxd2 5 Qxd2 Qxd2 6 Bxd2 Na6 with the same result) 4…Qxd2 5 Bxf7 Qxc1! 6 Qxc1 Nxf2 7 Kxf2 (it is important to leave White as little choice as possible about where to capture next) 7…Rg8 8 Bxg8 e5 9 Bxh7 g6 10 Bxg6 e4 11 Bxe4 Nc6 12 Bxc6 Bb7 13 Bxb7 a5 14 Bxa8 c6 15 Bxc6 a4 16 Bxa4 Ba3 17 bxa3 0-1.
- White wins simply by 2 Ba6 bxa6 3 Qg4! (White’s two moves could also be played in the opposite order) ..Bxg4 4 Kd1! Bxd1 5 a3 Bxa2 6 Ra2 Bxb1 and the same sequence as in exercise 1, but with reversed colours, unfolds.
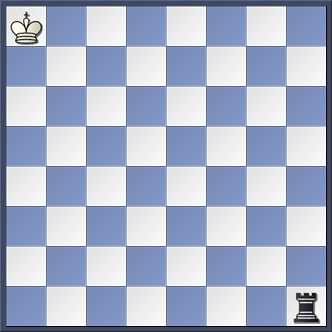
- The rook will win this. White starts 1 Kb7 Rd1 (the rook cannot come too close, but it does restrict the White king, which now cannot move to the c-file (e.g. 2. Kc6 Rd6 and Black wins) 2 Kb6 Rd4 3 Kb7 Rd5 4 Kb8 Rd6 5 Ka8 Rc6 and White is in zugzwang: 6 Kb8 Rc8 7 Kxc8#, or 6 Ka7 Ra6 7. Kxa6# 0-1.
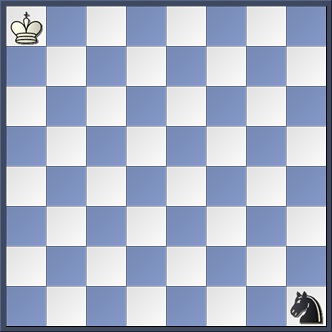
- The king will win this. White starts with 1 Kb7 and (carefully!) approaches the knight. A possible variation is ..Nf2 2 Kc6 Ng4 3 Kc5 Nf2 4 Kd6 Nh3 5 Kd5 Ng1 6 Ke5 Ne2 7 Kf4 Nxf4# 1-0.


Who knew suicide chess would be so complicated!